The Linksys SPA3102 VoIP Gateway is not supported for use with 3CX Phone System. See the list of supported VoIP Gateways here.
IMPORTANT This gateway was tested with the following firmware version: 5.1.10(GW). This device does NOT support T38 fax transmission on the Gateway Port and therefore cannot be used to connect to an analog line to receive or send faxes with 3CX Phone System.
Follow these steps to set up a LinkSys SPA3102 VoIP Gateway with 3CX Phone System for Windows.
Step 1: Configuring 3CX Phone System to work for use with the Linksys SPA3102
- Ensure that you have created the PSTN line in 3CX Phone System first. Take note of the Authentication ID field and the Authentication password that you have entered for the line connected to the VoIP Gateway.
Step 2: Configuring the Linksys SPA3102
- Connect the Linksys SPA3102 VoIP gateway to the network using the Internet/WAN port and mains power supply. The device will boot up, and providing you have DHCP installed on your network, will obtain an IP address.
- To get the device’s IP Address, check the most recent DHCP lease, or alternatively use a network scanner to find a device with the string “Linksys”.
- Connect an analogue phone to the Linksys “phone” port.
- Using the analogue phone, press “****”, and after the greeting message press 110# to retrieve the Internet/WAN IP address. Take a note of this IP Address.
- Press “7932#” and then press “1#” to enable the HTTP Configuration over the WAN port. Now, press “1” to save.
- Now point your browser to the gateway device’s configuration page: “http://x.x.x.x”, where “x.x.x.x” is the IP Address assigned to the device by the DHCP Server.
- Once the page loads click on the “Admin Login” link on the top right hand side of the page. This will provide the basic administration configuration version of the interface.
- Now click on the “advanced” link on the top right hand side of the page. This will provide the advanced administration configuration version of the interface.
- Now click the “ROUTER” and after that the “WAN SETUP” tab on the top of the page to set an IP Address in your local network – please use a static IP Address. Note that using the device as a router and a gateway device (or a router and an ATA device) simultaneously is not supported.

Linksys SPA3102 gateway WAN configuration - Click on the “LAN SETUP” node and change the “Enable DHCP Server” option to ‘NO’ and Submit your changes.
- Now click the “Voice” main tab followed by the “SIP” tab.
- In the “RTP Parameters” set the “RTP Packet Size” to “0.020”.
- Click on the “Line 1″ node and set the “Line Enable” to “No”.
- Click on the “PSTN Line” tab on the top side of the page. This will show the PSTN Line configuration page.

Linksys SPA3102 gateway PSTN Line configuration - Ensure “Line Enable” is set to “yes”.
- In the “SIP Settings section”, ensure the “SIP port” field is set to “5062”.

Linksys SPA3102 gateway Proxy Registration, Subscriber, Audio Settings - In the Proxy Registration section:
a. Set the “Proxy” field to the IP address or FQDN of the server on which the 3CX Phone System is installed.
b. Set the “Register” field to “yes”.
c. The “Register Expires” field sets the interval at which the gateway device will renew its line registration with the 3CX Phone System Server. You can leave the value at its default setting.
d. Set the “Use OB Proxy In Dialog” to “No”. - The Subscriber Information section represents the PSTN line connected to the gateway. Configure the line as follows:
a. The “Display Name” should have a name assigned to it. Choose a display name that will not match a possible number; it also must NOT be blank. If this field is blank, or matches the caller’s number, the device will operate in 2-stage dialing mode. Choosing an alphanumeric Display name is a safe choice. E.g.: “SPA3102″ or “Outside Line”.
b. In the “User ID” field, enter a name for the line.
c. Set the “Use Auth ID” field to “yes”.
d. In the “Authentication ID” and “Password” fields, enter the ID and Password that you entered for the line in the 3CX Phone System Management Console. These fields must match the ID and password set for the line in the 3CX Phone System Management Console.

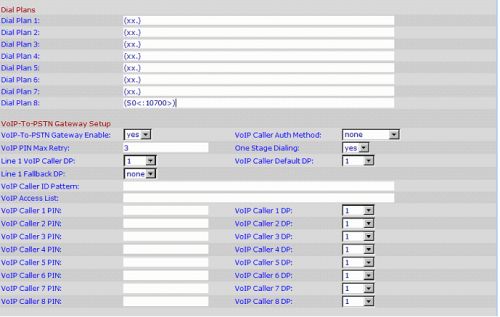
Linksys SPA3102 Gateway: Dial Plan, VoIP-To-PSTN Settings - In the Dial Plans section, set the “Dial Plan 8″ field to “(S0<:yyyy>)” where yyyy must be replaced with the ID that you entered for the line in the 3CX Phone System Management Console. For example, if the ID used was “10700”, the “Dial Plan 8″ field must be set to “(S0<:10700>)”.
- In the VoIP-To-PSTN Gateway setup section:
a. Set the “VoIP-To-PSTN Gateway Enable” field to “yes”.
b. Set the “VoIP Caller Auth Method” field to “none”.

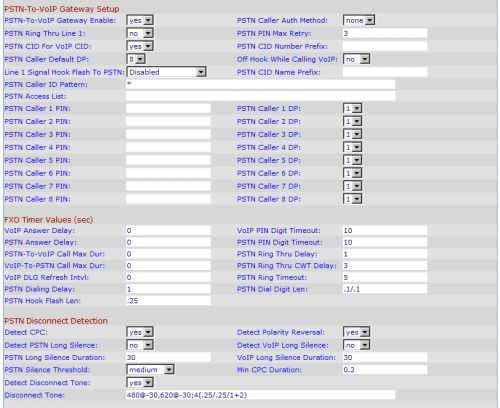
Linksys SPA3102 gateway PSTN-To-VoIP Settings - In the PSTN-To-VoIP Gateway Setup section:
a. Set the “PSTN-To-VoIP Gateway Enable” field to “yes”.
b. Set the “PSTN Caller Auth Method” field to “none”.
c. Set the “PSTN Caller Default DP” field to “8”.
d. Set the “PSTN CID for VOIP CID” field to “yes”.
e. Set the “PSTN Caller ID Pattern” field to “*”. Note that in some geographical areas, this may cause incoming calls to fail, because the device incorrectly interprets the CallerID format. If this is the case, you may need to disable CallerID parsing by setting this field to empty. - By default, the SPA3102 will wait for 16 seconds before delivering a call to a SIP device. To change this, go to the “FXO Timer Values (sec)” section, and change the “PSTN Answer Delay” field to 0. This will set the gateway to answer calls immediately.
- Click on the “Submit All Changes” button at the bottom of the page to save your settings and restart the device. The other settings that were not discussed are optional and can be left as default.
- After the gateway has restarted, switch to the 3CX Phone System Management Console, and click on the Phone System -> “Line Status” (This is the default page). In the section “External Lines”, the PSTN line connected to the VoIP Gateway should be listed with a green status light.
How to Configure a LINKSYS SPA3102 for ATA Functionality
Note: The Linksys SPA3102 can either be set as a gateway OR as an ATA device. 3CX does not support the device when configured in both modes simultaneously.
Follow these steps to set up a Linksys SPA3102 VoIP Gateway with 3CX Phone System as an ATA:
- Ensure that you have created the extension in 3CX Phone System first. Take note of the extension number, Authentication ID field and the Authentication password that you have entered for the extension in the 3CX Phone system.
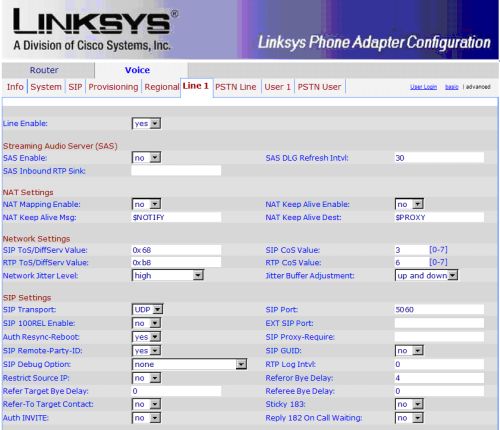
- Now click the “VOICE” tab, and after that, click the “Line 1″ tab to configure the Linksys as an ATA for use with your analogue phone.

Linksys SPA3102 Gateway: Line 1/ATA settings - Ensure “Line Enable” is set to “yes”.
- In the SIP settings section, sip port must be configured to 5060.

Linksys SPA3102 Gateway: Line 1 Proxy, Registration and Subscriber settings - In the Proxy and Registration section:
a. Set the “Proxy” field to the IP address or FQDN of the server on which the 3CX Phone System is installed
b. Set the “Register” field to “yes”
c. The “Register Expires” field sets the interval at which the gateway device will renew its line registration with the 3CX Phone System Server. You can leave the value at its default setting. - The Subscriber Information section represents the Extension configured in the ATA part of the Linksys. Configure the extension as follows:
a. The “Display Name” should have a name assigned to it. Choose a display name that will not match a possible number; it also must NOT be blank. If this field is blank, or matches the caller’s number, the device will operate in 2-stage dialling mode. Choosing an alphanumeric Display name is a safe choice. E.g. “Joe Boggs” or “Daniel Smith” or “Sales Desk 1”.
b. In the “User ID” field, enter a name for the extension.
c. Set the “Use Auth ID” field to “yes”.
d. In the “Authentication ID” and “Password” fields, enter the ID and Password that you entered for the extension in the 3CX Phone System Management Console. These fields must match the ID and password set for the extension in the 3CX Phone System Management Console.

Linksys SPA3102 Gateway: Line 1/ATA audio configuration. - In the Audio Configuration section, set the “Preferred Codec” field to “G711u”.
- In the Dial Plans section, set the “Dial Plan” to [x*].
- Click on the “Submit All Changes” button at the bottom of the page to save your settings and restart the device. The other settings that were not discussed are optional and can be left as default.
After the gateway has restarted, switch to the 3CX Phone System Management Console, and click on the Phone System -> “Line Status” (This is the default page). In the section “Extensions”, the extension connected to the VoIP Gateway should be listed with a green status light.